Reference
This is the reference for Interactive CYOA creators.
While the rest of the tutorial focuses on individual concepts within the creator, this section focuses on real issues and desired outcomes, and walks you through how to achieve it.
Creator
Zoom in and out
As the desktop application is an Electron app, it is functionally just a website that runs in its own web browser. Because of this, you can zoom in and out of the desktop app by doing Ctrl++ (Ctrl+Shift+=) to zoom in, and Ctrl+- to zoom out.
Tip
If you need to reset your zoom level and you're using the offline app, simply look at the top where it says View. Press that, and then Actual Size.
Alternatively, press Ctrl + 0.
Open the console
In order to open the console, you have to press Ctrl + Shift + I.
Alternatively:
- In the browser, right click and look for Inspect (Q) or Inspect element
- at the top of the window on the Desktop app, go View → Toggle Developer Tools.
After that, go into the Console tab.
General
Text
Make specific text a different colour
To do this, simply use inline CSS styling between HTML tags.
For example, this:
| HTML | |
|---|---|
makes the text red.
Note
If you want to learn about how to get hex codes, visit here.
Add hyperlinks to your CYOA
See here.
After that, add hyperlinks as normal:
Make secret text that appears when pressing an invisible Choice
If you wanted to hide text that only shows when pressing on an invisible Choice, it's quite simply to do. You simply have to lock Addons behind a Selected Choice requirement.
Note
Make sure that you put a space for the choice text and/or title so that it's clickable, yet invisible.
What this looks like:

How to do it:
- Add a new Addon
- Add a Selected Choice requirement
- Put the ID of the empty Choice (that you want pressing and showing the text) into the requirement
If you wanted the text to not show up on the same Choice, you can simply make the Choice require another Choice, and set the filters such that Choices that don't fulfil their requirements are invisible.
Another method is by using Words. Have the Word value be as long as you want, though you might have to use line breaks in order to have multiple lines.
Change text alignment without Private Styling
Private Styling has its downsides. However, you can change the alignment (where the text is, such as in the centre or to the left) by using inline CSS like so:
The full list of styles available are:
left– Aligns the text to the leftright– Aligns the text to the rightcenter– Centers the textjustify– Stretches the lines so that each line has equal width (like in newspapers and magazines)initial– Sets this property to its default valueinherit– Inherits this property from its parent element
Learn more here.
Style
Move the other colour stuff to this section.
(TODO) Find out the hex code of a colour
Colour in CSS is set in a variety of different ways, such as by a hex code or RGB values.
To learn more, see CSS Legal Color Values and CSS Colors.
If you need help selecting a value, see Color Picker for a simple colour picker, or Color Wheel to easily create complementary colour palettes.
(TODO) Generate a colour palette
Use Color Wheel to easily create complementary colour palettes.
There is also
(TODO) Change to a font not in the Creator
(TODO) Make text glow
(TODO) Change the colour of selected Choices
(TODO) Change the colour of Choices that don't meet the Requirements
Make Row Backgrounds transparent
See here.
Get rid of the extra, repeating Row background
You may notice that after you've set your background, your Rows will repeat the Background as well. This is inconvenient if you've set the Background to anything but a simple colour, as it is incredibly obvious and unprofessional.
Here's an example of the repeating background:

Unfortunately, this method deals with Private Styling, therefore:
Danger
Save this as the last Styling you do, as you have to access Private Styling in order to do this.
To get rid of it is simple, just open up Row Settings → tick Use private styling? → Manage Background design → and remove the Background photo on the left side.

Now the background will be whatever colour it is usually. To make it transparent, see below:
(FIX GIF) Make the Row Background transparent
Go into Row Settings → Use private styling? → Manage Background design → and turn down the A (Alpha) slider on the Background column (far left).
Make the Point Bar icons white for darker CYOAs
You may wish to make your Point Bar icons white if you have a particularly dark CYOA, making it hard to see the icons.
Simply add this to your index.html file, somewhere in the <head> section:
You can change white to any colour here, or by using a hex code (like #000080 for navy blue).
(TODO) Make a group of invisible Choices in a Row not take up any space
Can apply to the Row itself too.
Private styling stuff. Compare a normal Row with the one for the World button in the CYOA below, and point out the differences.
See https://infaera.neocities.org/cyoa/OverpoweredIsekai/ for a working example.
Whole CYOA
Changing the page title
In order to change the title of the tab in the browser, simply edit index.html.
Look for:
| HTML | |
|---|---|
One title format is {CYOA name}: Interactive, but whatever works for you is fine.
Changing the page icon
Changing the icon of the page's tab is simple, all you need to do is add the following code to your index.html file, just below the <title> tag:
| HTML | |
|---|---|
(TODO+EX) Tabs / Table of Contents Menu
To make a Tabs menu
(TODO) Show Points Menu
Use this if you have a lot of Point Types. This allows you to give control over to the player about which Points show up in the Points Bar.
Much like the above, create a Tabs menu, but instead of each option opening a Row, use their Point Type to hide the choices.
This is especially useful for mobile users (which make up a surprising amount of ICYOA players), as their screens are usually smaller and thus can't see as many Point Types in the Point Bar.
Show a loading progress indicator
See here.
Make the Background completely static
A static background, as opposed to a continuous or overlapping background, is one that scrolls with the user, perfect for backgrounds that do not repeat perfectly.
An example of a continuous background is the Worm V3 Revised interactive (shown below). No matter how far you scroll, the background stays in the exact same position.
It was first used in the Jedi - Guardian of the Republic Interactive CYOA, where the background fixes are attributed to u/LOLLOL12344.

Warning
It is likely your background will repeat behind Choice and Row backgrounds as well.
In order to manually fix this, you have to go into each and every Row, turn on Private Styling → Manage Background Design → Remove Photo.
Now, you have the default background colour in the background. You don't have to turn this off, but if you want to: Private Styling → Manage Background Design → Uncheck Color of the row backgrounds and/or Color of the choice backgrounds.
It's probably a good idea to have a background on Choices, however.
Tip
If you want this to happen automatically, however, check out the Interactive CYOA Creator Plus, a modified ICC that automatically stops rows from repeating the background image.
You can simply put this code straight into your index.html file in <style> tags. Put this in the <head> section:
| HTML | |
|---|---|
This will modify your background to become static!
Make your Background fade in
Add this to a <style></style> block in your index.html, or in your own CSS file:
This will mean that when the background is launched for the first time (and any other time it changes) it will fade into that colour.
Make the Background a different colour every 20% of your CYOA
This is how to make your a different colour every 20% of your CYOA you scroll. For the programming-savvy, you may be able to hack this code to change for your use-case.
If you're looking for a way to do this at arbitrary points, such as with each Row (as opposed to each 100px or so), check out the section below this one.
Note
Credit to Soldier637 for this code.
Warning
I have not tested this code. It may or may not work. YMMV.
Put this into your index.html:
Make the Background different for each Row
This will allow you to dynamically change the background of your CYOA depending on arbitrary placement of <div> tags.
Here's a demo:
Example
Note
In order for this to work, you must use the Modded Viewer.
The ICC+ Viewer may also allow this, but this has not been tested.
To get started, download these files:
- dynamic-background.js
- dynamic-background.css (Optional)
The CSS file is optional, but contains a starting point to base your own background from.
Place the JavaScript (.js) file in the js/ folder of your Viewer, and your CSS (.css) file in the css/ folder of your Viewer.
Then, place this in your index.html in the <head> section to import the files:
| HTML | |
|---|---|
In the css file, copy this code for each of your different backgrounds:
.your-id-here could be something like a colour: .red-bg, or maybe just the name of your section: #perks.
Warning
Don't use direct colour names like .red or .lightgreen! These are built-in classes that apply the background colour no matter what value you set.
However, you could use this to your advantage and only use built-in colours to create backgrounds, without needing a separate CSS file.
If you wanted the colours to fade together in a transition, see the Make your Background fade in section in this tutorial, and apply that code in this CSS file.
In your actual project.json in the ICC, add this to the very top of your Row's Text:
| HTML | |
|---|---|
Leave "bg" as-is.
After all that, your CYOA should not change depending on which Row is in focus!
(TODO) Making the CYOA embed on sites
Wanted to know how to make your CYOAs have a little embed that shows information when posted to sites such as Discord and Twitter?
You don't need to include all of these, they are all optional.
Simply paste this code in the <head> section of your index.html:
| HTML | |
|---|---|
Combining with a title, it will produce this:
See more here.
Make the CYOA show up on search engines
SEO—Search engine optimization—is the process of making your site look better to search engines, so that it will appear higher in the search results.
I recommend giving SEO a Google search if you wanted to know more.
Simply paste this code in the <head> section of your index.html:
Note
Make sure you aren't duplicating tags! You should only have one <title>, description, author, and keywords tag.
See more here.
(TODO) Change the Scrollbar Colour
Add this to your index.html file, in the <head> section:
| HTML | |
|---|---|
Alternatively, put it in any .css file you have.
Note
Credit to u/PNG-MAN for this code.
Download someone else's Interactive CYOA
There are multiple methods of doing so.
Using IntCYOAEnhancer
Tip
I recommend doing this one, since once the IntCYOAEnhancer is set up, you just need the press of a button to download anyone's project.json.
See here.
Accessing the project.json directly
As you may know if you are familiar with the Viewer layout, the project.json file containing the code for the ICYOA is located in the same folder as the index.html. Using this logic, if an ICYOA was located at mycyoa.com, then you would be able to access the project.json at mycyoa.com/project.json.
(TODO+LINK) Embedded in JavaScript
If the above method fails, they could have embedded their project.json directly into their Viewer's app.c533aa25.js.
To get the project.json out, simply follow the opposite of these instructions.
Change project.json to a different name
There could be many reasons why you want a different name than project.json. Perhaps you're working with different versions of the project, or perhaps your web host doesn't allow .json files, or perhaps you just don't like the name.
Regardless of the case, you must go into your js/app.c533aa25.js file, and do a Find and Replace (Ctrl + H) in a text editor. Set Find to project.json and Replace to your new name, such as Beta-v2.json.
Choices
(TODO) You may only pick X options
Use Allowed Choices.
(EX TODO) You may only pick X options from an arbitrary group
Similar to the above, except these choices are not required to have been from the same Row.
You do this buy creating a unique Point Type that is unable to go below 0, and is also hidden. Each choice in this arbitrary group costs 1 of these points.
This can be useful compared to the above if you wanted to have a dynamic
??? example (TODO)
| Text Only | |
|---|---|
1 | |
Choice requires another's Choice
See here
(TODO) Hide a choice if it doesn't meet the requirements
Simply use filters.
(TODO) Disabled Choices via Selected Choice
If you have some choices that have prerequisites/requirements, then having them require those requirements will enforce that users don't cheat, and follow the rules.
(TODO) Making Choices Invisible
There are two ways to make a Choice invisible, depending on what you want:
-
If you want a Choice that is merely meant for functional purposes (i.e., it does some logic in the background), simply make the Choice title and text empty, and it will effectively render it invisible.
Best used with an invisible Row and at the end of the document.
-
If you want to make choices that don't fit requirements disappear, then you can solve that using filters. We discuss that below.
Note
Instead of making choices invisible, consider merely blurring them or dimming them such that they're visibly unable to be selected. This way, users will be able to tell there's a potential Choice there, and they simply need the requirements.
If you still want to make Choices invisible, continue on ahead.
Choices that don't have their requirements can be made invisible using filters.
Tip
Warning
Before you use private styling, make sure you've read and understood this.
Unless your CYOA constantly and consistently wants to hide every choice that doesn't have its
(WIP) Chaining Invisible Choices
There may be times where you have to do something like activate a function more than once, but the Choice which is selected does not allow that, such as wanting to change multiple Words.
A way to bypass that, is
(TODO) Dynamically change Allowed Choices number
You can dynamically change the
Make a Choice only able to be selected once
This will make sure that once they select the Choice it cannot be reselected1.
Warning
This method is hacky and relies on bugged mechanics.
This is what it'll look like once you're done:

What you do is:
- Make a Point Type just for this option
- Hide the Point Type
- Set the Point Type to
1 - Set a += More or Equal requirement on the Choice you want to affect
- Select the Point Type you created, and set it to
1 - Add a Score setting the Score to
1
And you're (functionally) done! You can reset it in the creator by clearing your selected IDs.
But we can go further. In the private styling we can setup disabled Choices so that they look like they've been selected, so this can only be used if the Row is explicitly for Choices you don't want to be taken back, otherwise the styling would be inconsistent.
Do this like so:
- Turn on Private Styling
- Manage Filter Design
- Change the Filter on Choice that is missing its required to the same as the filter above it, matching it
And then we get this:

There is — as of yet — no known method to detect whether the Choice has been pressed because it actually stops being selected as soon as you press it, with the bug being that it appears and acts disabled.
(TODO EX) Make a Requirement based on a Choice that can be selected multiple times
To do this, you simple have to:
- Create a hidden point type
- Make sure it's set to 0
- Add a Score to it
- Set the score to increase the Point by one
- In the Row, Choice, or Addon you want to detect the multiple selected choice, make a:
- More Than 0 Requirement, if you wanted to detect if the Choice has been increased more than once
- Less Than 0 Requirement, if you wanted to detect if the Choice has been put in the negatives
IDs
(TODO AN EX) Navigation with ID / Title list
ID / Title list as helpful way of navigating your way through a large CYOA – showcase JRPG Traitor
Using the See ID/Title List option in the Sidebar allows you to quickly navigate through your CYOA.
(TODO) Reusing IDs
Interesting fact: Setting multiple things to the same ID allows you to activate one through the other
Requirements
(TODO) Logic Gates and Requirements
| Logic Gate | Explanation | Requirement |
|---|---|---|
| AND | True only if all IDs are selected | GOTO |
| OR | True if at least one ID is selected | GOTO |
| NOT | True if an ID is not selected | GOTO |
| NOR | True when all IDs are not selected | GOTO |
| NAND | True unless all IDs are selected | |
| XAND | True if all IDs are either selected or not | |
| XOR | True if one ID is selected and the other is not |
'All of these are selected' requirement
There is no such requirement within the ICC at this moment. To emulate it, however, is simple. Just add more than one Selected Choice requirement, and it will ensure that you have each and every one selected.
'None of these are selected' requirement
As above, simply add a Non-selected Choice requirement for each ID that must not be selected.
(TODO) 'Not all of these are selected' requirement
Functioning as a NAND gate.
(TODO) 'All of these are either selected or non-selected' requirement
Functioning as a XAND gate.
(TODO) 'One of these is selected and another is non-selected' requirement
Functioning as a XOR gate.
Points and Scores
Hide Point Types
Go to the Sidebar → Open Features → Manage Points and find the Point Type you want to hide.
In the Id Needed to Show field, type something you would never use as an ID, such as HIDE_ME. As an object with your chosen ID should never be selected, the Point Type should be ID.
Tip
Should you choose the exact same ID for all hidden options, you can have a special button you only activate for debug purposes that allow you to see all the hidden Point Types.
(EX TODO) Display Hidden Point Types when a Choice is selected
Do the same as Hide Point Types, but instead of an ID that won't be selected, purposely choose the Choice's ID that will show the Point Type.
Example
…
(TODO) Limit how many of an arbitrary group can be selected
I find it particularly useful in hidden point types that determine how much of a thing you’re allowed to select
This uses hidden Point types.
(TODO) Making discounts
Discounts can be made using requirements.
Get a list of Point Types
To do this, first, open the console.
Then type this:
| JavaScript | |
|---|---|
It will output a list of Points by their name and their value.
It should look like this:
Change how many points I have
This is a hacky way on how to change it as a player.
There are two methods:
- Use the IntCYOAEnhancer script to change the values, or
- Manually edit it in the console
We'll be showing the second solution here.
To do this, first, open the console.
Then, get a list of Point Types. Find the ID associated with your Point Type on the left most side surrounded by square brackets. Keep a note of that number.
Then type this:
| JavaScript | |
|---|---|
Replacing:
0with the ID of your Point Type1000000with whichever number you desire.
Images
(TODO) Separate images from the project.json
You can easily separate images from the project.json file.
Note
This only works with local images.
To do this, you simply go into Save/Load Project → Download Finished Project With Separate Images.
This will give you a zip file called hello.zip, which you can and should rename to something more helpful.
Extract the zip, and inside you should find your project.json with a hugely reduced size, and all the images you've uploaded separated in an images/ folder.
Next, move the project.json file and the images/ directory into the same directory as your Viewer.
ICC Quote
You can use the button below to save when you have finished your project, it will keep the images separated from the JSON. Do not overwrite your project, as the new JSON-file inside the zip this downloads will have no pictures if loaded into the Creator. Place the JSON into the app-file like normal, and the images-folder besides the other folders. If the project has a lot of images then they might end up not showing when someone loads on the page, if so then just use the normal way, and use Image Compression in features to reduce the size of the project file.
Allow <img> tag
The ICC doesn't allow using <img> tags by default, but this is bypassed in the modded Viewer, available here.
Words
Changing Words with Choices
You can change the value of Words using an Object function.
Note
You can only change one Word at a time using this method. If you want to change more than Word, consider chaining invisible Choices.
To do so:
- Go into the Edit Row menu
- Go down to the Choice you want to change the word
- Open the Functions drop down menu
- Select Word will be changed to something else at select
You should have this screen now:

Id of word that will change
This is where you select the exact Word that you will change.
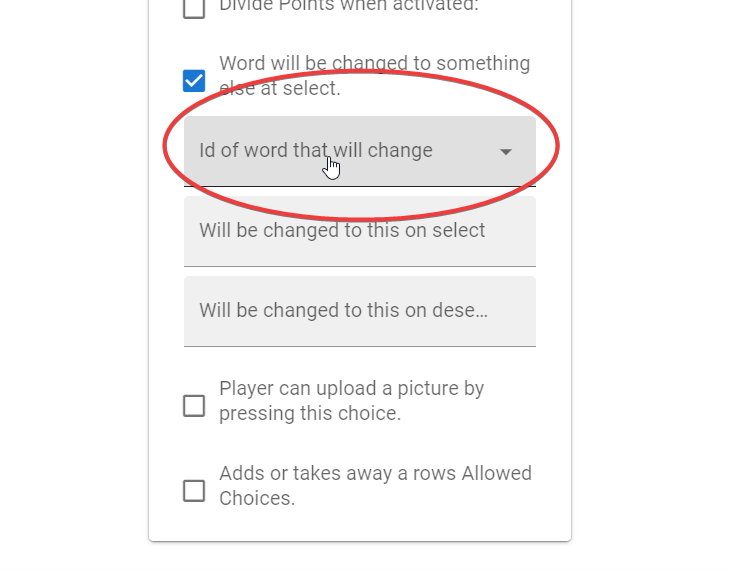
By pressing on this, it will open a dropdown menu of all the Words, so you don't need to remember the ID of your Word.
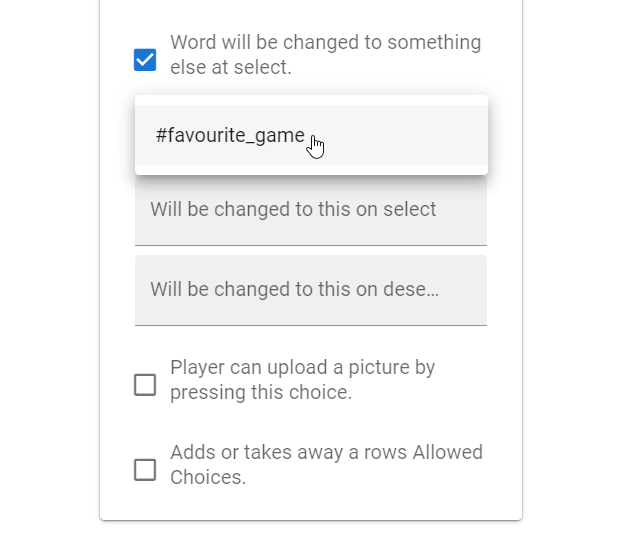
Will be changed to this on select
This is what the value of the Word will change to when the Choice is selected.

Will be changed to this on deselect
This is what the value of the Word will change to should this Choice be deselected.
There are two strategies here:
- If you want to return to the default one that was set in the Words menu, simply put the option here.
- If you want to make the change permanent (at least, until something else changes it), then put the same value as the above input in here.
For this tutorial, we are going for the former strategy:

Putting it all together, this is what it looks like:
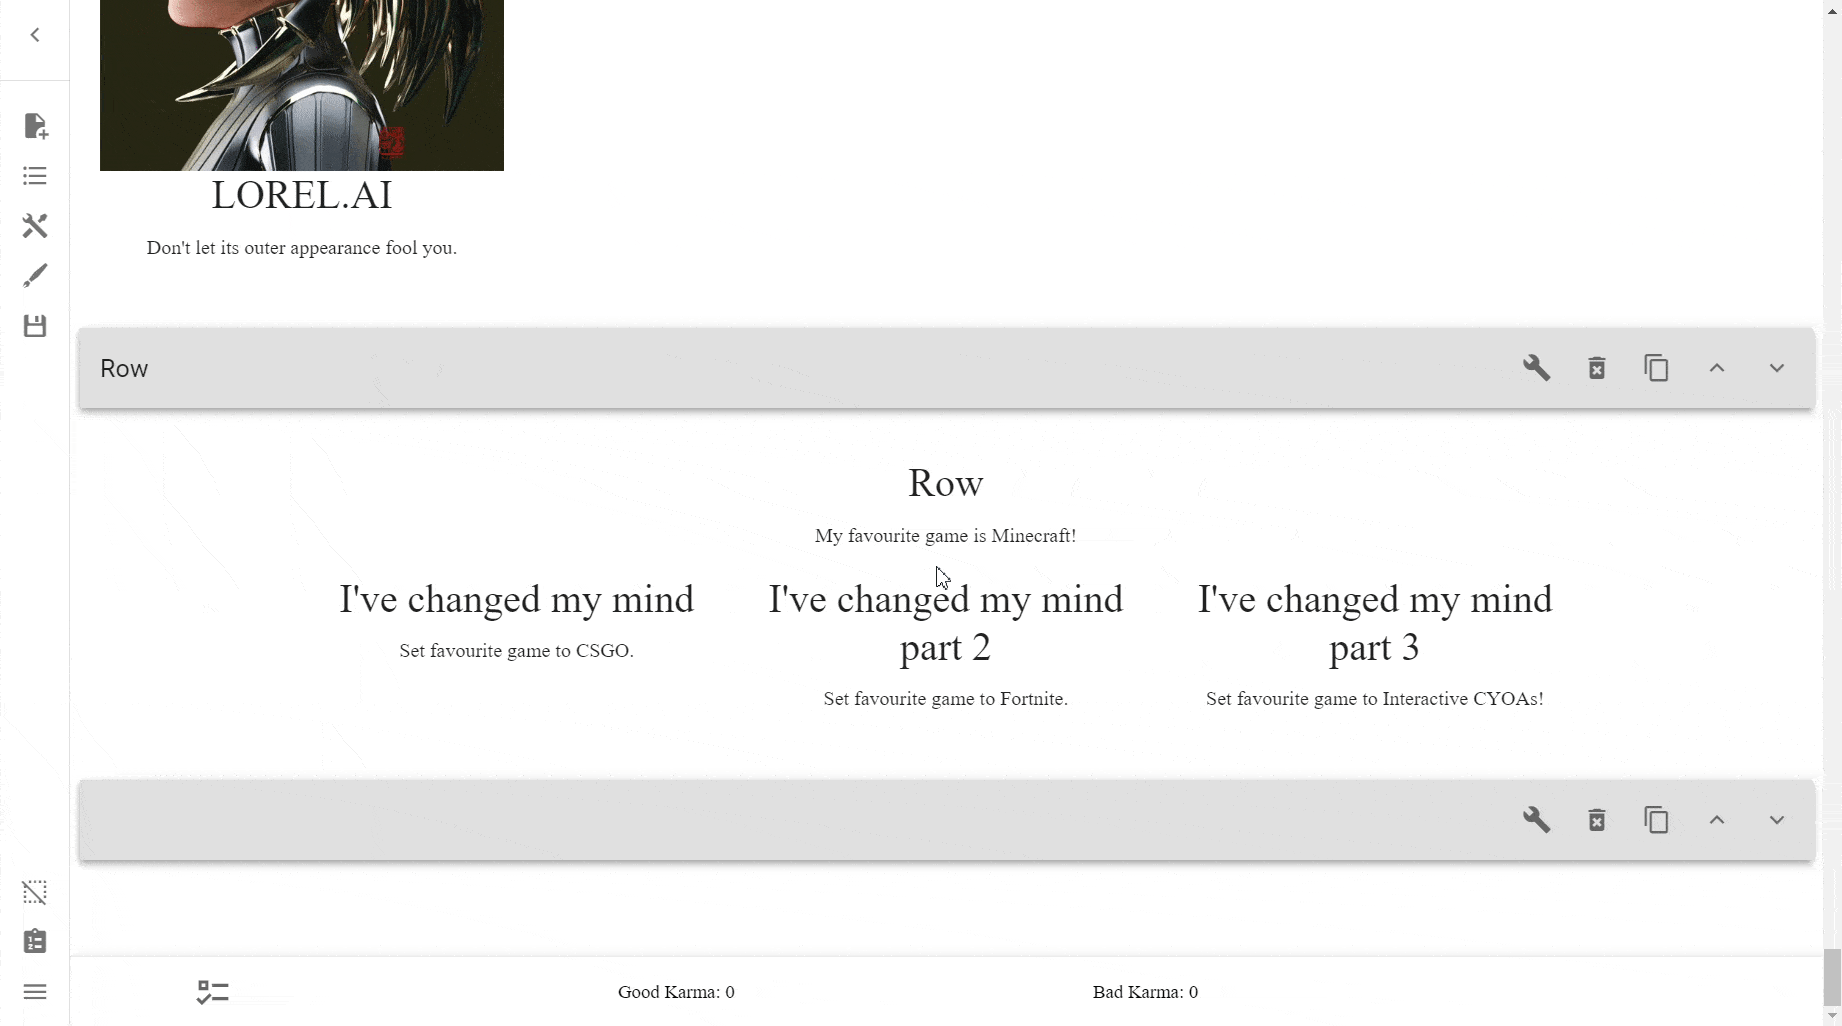
One thing you could put here instead of a favourite game could be a narrator remarking on a player's choice. For example:
Ooh you picked #choice did you? Very interesting indeed…
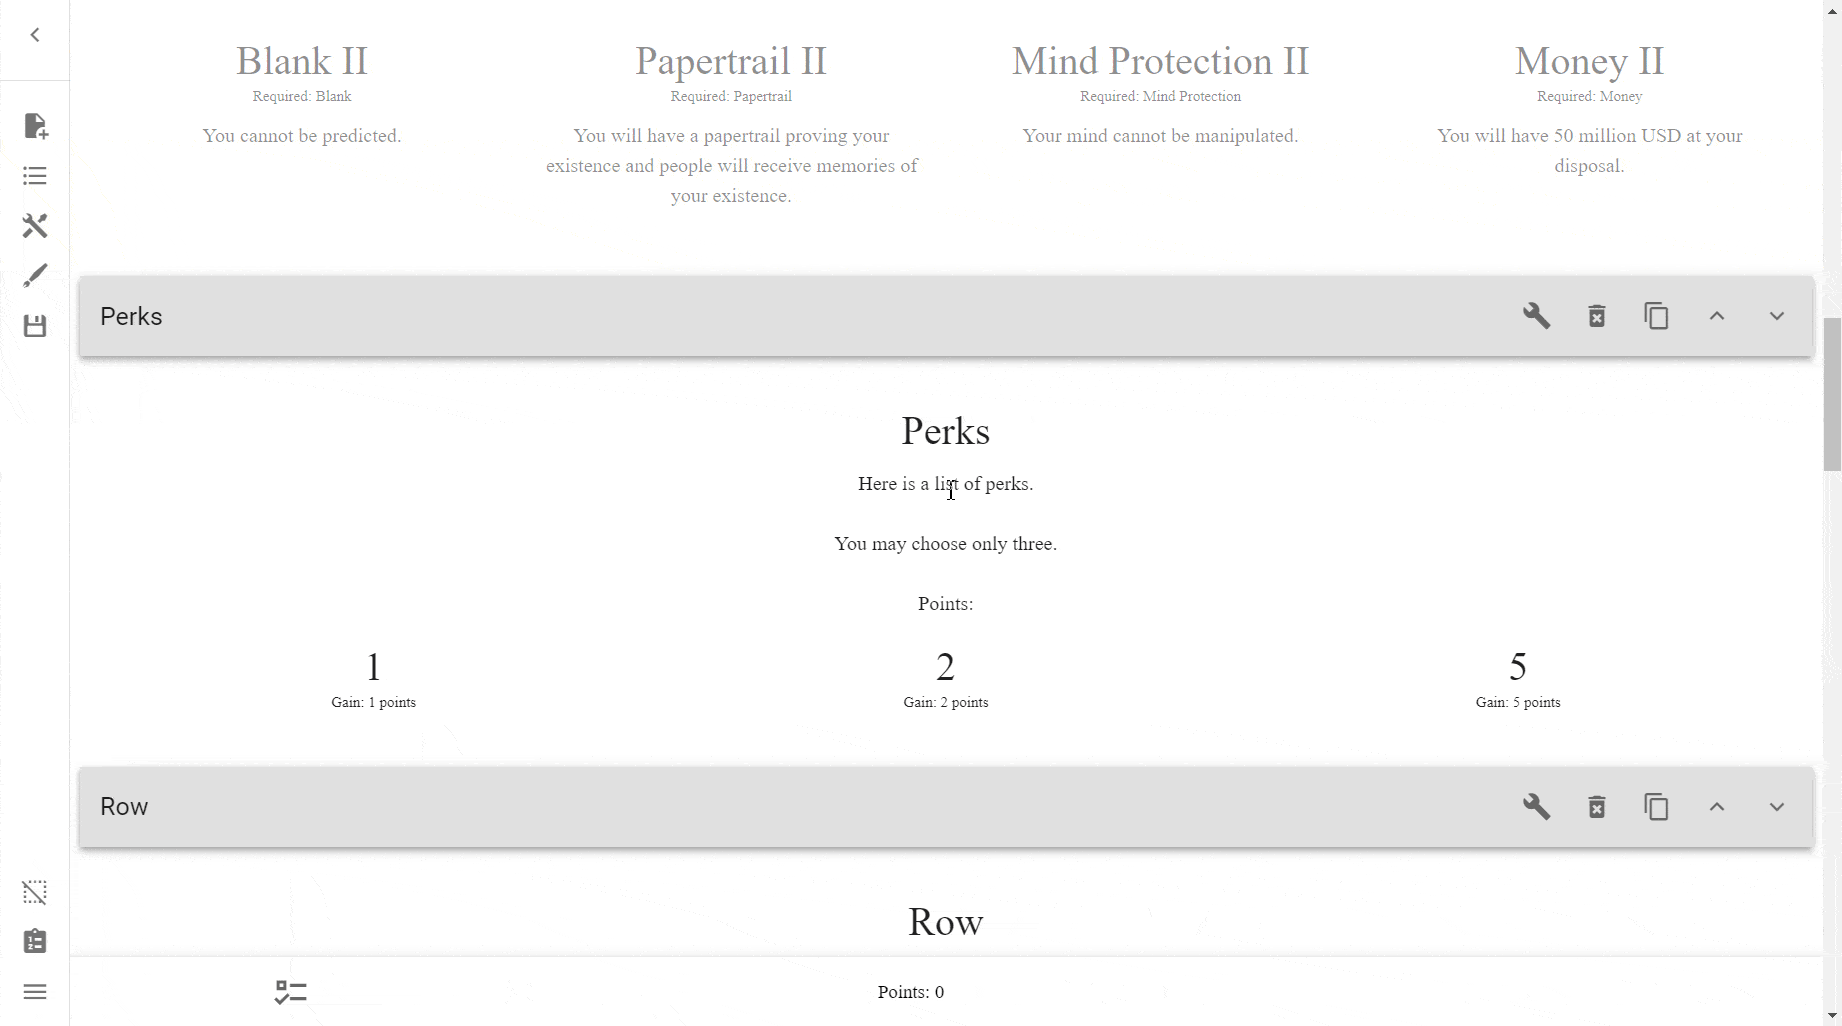
Dynamically display Points inside a Row, Choice, or Addon
This is useful if you wanted to remind the user how many points they have, and may be useful if you don't desire to have a Points Bar.
To achieve this, simply go into Open Features → Words, and create a Word using the ID of your Point type.
Warning
Make sure that your Word ID and Point-type ID are EXACTLY the same.
For example, if your Point-type ID was perks and your Word ID was #perks, you would need to change your Point-type ID to #perks or vice-versa.
Tip
You should keep the format of #{point_name} because it makes it easier to differentiate between points that are dynamically inserted or not.
It also makes it easier to see when editing text that something is meant to be inserted there.
Warning
You must set the word's ID before the point's ID2.
From the 30.8.2022 Changelog
Changed words so that the sum of a point type can be shown in the text, on rows, choices, and add-ons. To do this, the id of the point-type should be pretty unique, and be identical to the id of the Word.

Buttons and Variables
Hide a Row behind a button
Use a toggleable variable and use that ID in a selected choice requirement
Make a DnD-style 1d20 skill check
This is how to make this:
Example

This example uses a 1d20 dice, but you could possibly hack this to produce other methods.
Note
This is quite a complex example, but once it is made you can just clone the Rows if you need it again.
- Create a Point Type to be used for this only
- Set the
Id Needed To Showoption to something random to hide it from the Point Bar
- Set the
- Create the Row that will house the
Rollbutton- Switch on
Button? - Select
other - Tick
Random or Variable?on - Select
Only Unselected choices? - Select
Button can only be pressed if no choices is selected?only if you want it to be a one time thing - Go back to the Row edit menu
- Change
Allowed Choicesto 1 - Create a base Row for the value of "1"
- Under that Row, add a Score with the value of "-1" to add to a Point Type
- Select the dummy point type you made above
- (optional) if you want to display the result later on
- To display the result of this choice, create a Word
- Change the ID to something unique like #encounter-roll, and set the text to something like
0or(Roll first). This is the text that is displayed before you have rolled, so it doesn't matter. - Select Functions →
Word will be changed to something else at select. - Change
Will be changed to this on selectto 1, this will change for each cloned Choice - Change
Will be changed to this on deselectto 0, don't change this when cloning
- Clone the Choice 20 times (the amount of sides the die has)
- Go through each Choice and update the Score and (if you had set it above) Word number as is needed
- (optional) if you want to display the result and did the previous steps: use
#encounter-rollin your text, e.g. "You rolled a #encounter-roll!"
- Switch on
- Create the Row that will house the Results
- Select
Non-activatable? - Create as many Choices as you want messages
- Set requirements for both. Use a
+= More Thanrequirement for what the baseline the roll should achieve to succeed. - For the display of failure, use a
- Less Thanrequirement for the same number as above, and aMore Thanequal to 0 (as this is the default, and you don't want to count it as a failure yet).
- Select
(TODO) Create a button that picks a random Choice only once and permanently
This makes it so that once you press the button not only does the button disappear, but you will be unable to deselect the chosen option.
This is good if you wanted a truly random and risky part of the CYOA.
Note
It is recommended that you make such random selections optional for a regular CYOA, otherwise users who do not choose to opt-in with a selection would have to refresh and re-import their options, and may become frustrated with your CYOA.
Of course, if the CYOA is based around randomness, probability, and luck (such as doing a skill check in DnD), or if you have made a 'Hard' difficulty for your CYOA then this could be useful.
Groups
Display a list of all Choices selected within a Row or Group
This can be useful if you wanted to give a summary at the end, with Rows like "Companions" only showing the selected Companions.
To do this:
- Create a group
- Add the Row to the Group or add all Choices you want to the Group
- The latter is is used, for example, in situations where you want to lump Choices across multiple Rows—but not all of them—into the same Group. A situation this could happen is filtering by something other than the Row/Section category. Displaying all female characters whether a Companion or Enemy, for instance.
- Create a new Row
- Enable Selected Choices?
- Enable Selected Choices from Group Id
Et voilà! It should be working as expected.
HTML
Formatting
Headings
| Example | HTML | Note |
|---|---|---|
Heading 1 | <h1>Heading 1</h1> | Used for the title |
Heading 2 | <h2>Heading 2</h2> | Used for top-level sections |
Heading 3 | <h3>Heading 3</h3> | |
Heading 4 | <h4>Heading 4</h4> | |
Heading 5 | <h5>Heading 5</h5> | |
Heading 6 | <h6>Heading 6</h6> |
Text
| Example | HTML |
|---|---|
| This is bold text This is strong text | This is <b>bold</b> textThis is <strong>strong</strong> text |
| This is italicized text This is emphasized text | This is <i>italicized</i> textThis is <em>emphasized</em> text |
| This is bold and italicized text | This is <i><b>bold and italicized</b></i> text |
| This is underlined text | This is <u>underlined</u> text |
| This is highlighted text | This is <mark>highlighted</mark> text |
| This is superscript text | This is <sup>superscript</sup> text |
| This is subscript text | This is <sub>subscript</sub> text |
| This is big text | This is <big>big</big> text |
| This is small text | This is <small>small</small> text |
| This is | This is <del>deleted</del> text |
Allowed HTML tags
Note
Remember: Anything that is not allowed is only not allowed when it is inputted into the Creator itself, not if it is loaded separately in the index.html!
Tip
Want to use tags that aren't allowed? Check out the Modded Viewer. It enables hyperlinking and lots of other things, and the diff admonition shows where in the code the sanitizer makes exceptions, meaning you can add your own exceptions there.
The ICC+ viewer also allows this.
The following are the default allowed tags that are rendered with the Viewer:
Info
| Tag | Explanation |
|---|---|
| <a> | Defines a hyperlink3 |
| <abbr> | Defines an abbreviation or an acronym |
| <address> | Defines contact information for the author/owner of a document |
| <article> | Defines an article |
| <aside> | Defines content aside from the page content |
| <b> | Defines bold text |
| <bdi> | Isolates a part of text that might be formatted in a different direction from other text outside it |
| <bdo> | Overrides the current text direction |
| <br> | Defines a single line break |
| <blockquote> | Defines a section that is quoted from another source |
| <caption> | Defines a table caption |
| <cite> | Defines the title of a work |
| <code> | Defines a piece of computer code |
| <col> | Specifies column properties for each column within a <colgroup> element |
| <colgroup> | Specifies a group of one or more columns in a table for formatting |
| <data> | Adds a machine-readable translation of a given content |
| <dd> | Defines a description/value of a term in a description list |
| <dfn> | Specifies a term that is going to be defined within the content |
| <div> | Defines a section in a document |
| <dl> | Defines a description list |
| <dt> | Defines a term/name in a description list |
| <em> | Defines emphasized text |
| <figcaption> | Defines a caption for a <figure> element |
| <figure> | Specifies self-contained content |
| <footer> | Defines a footer for a document or section |
| <h1> to <h6> | Defines HTML headings |
| <header> | Defines a header for a document or section |
| <hgroup> | Defines a heading and related content |
| <hr> | Defines a thematic change in the content |
| <i> | Defines a part of text in an alternate voice or mood |
| <kbd> | Defines keyboard input |
| <li> | Defines a list item |
| <main> | Specifies the main content of a document |
| <mark> | Defines marked/highlighted text |
| <nav> | Defines navigation links |
| <ol> | Defines an ordered list |
| <p> | Defines a paragraph |
| <pre> | Defines preformatted text |
| <q> | Defines a short quotation |
| <rb> | Defines a ruby base element |
| <rp> | Defines what to show in browsers that do not support ruby annotations |
| <rt> | Defines an explanation/pronunciation of characters (for East Asian typography) |
| <rtc> | Defines a Ruby Text Container |
| <ruby> | Defines a ruby annotation (for East Asian typography) |
| <s> | Defines text that is no longer correct |
| <samp> | Defines sample output from a computer program |
| <section> | Defines a section in a document |
| <small> | Defines smaller text |
| <span> | Defines a section in a document |
| <strong> | Defines important text |
| <sub> | Defines subscripted text |
| <sup> | Defines superscripted text |
| <table> | Defines a table |
| <tbody> | Groups the body content in a table |
| <td> | Defines a cell in a table |
| <tfoot> | Groups the footer content in a table |
| <th> | Defines a header cell in a table |
| <thead> | Groups the header content in a table |
| <time> | Defines a specific time (or datetime) |
| <tr> | Defines a row in a table |
| <u> | Defines some text that is unarticulated and styled differently from normal text |
| <ul> | Defines an unordered list |
| <var> | Defines a variable |
| <wbr> | Defines a possible line-break |
Allowed attributes
Attributes provide additional information about HTML elements.
| HTML tag | Explanation | Attribute(s) |
|---|---|---|
| <b> | Defines bold text | style |
| <p> | Defines a paragraph | style |
| <span> | Defines a section in a document | style |
| <strong> | Defines important text | style |
CSS
Allowed styles
Tip
Want to use properties that aren't allowed? Check out the Modded Viewer. It enables hyperlinking and lots of other things, and the diff admonition shows where in the code the sanitizer makes exceptions, meaning you can add your own exceptions there.
Here is a list of allowed styles:
| CSS Target | Property | Explanation |
|---|---|---|
| * | color text-align font-size | Sets the color of text Specifies the horizontal alignment of text Specifies the font size of text |
| p | font-size | Specifies the font size of text |
Allowed style tags
See the HTML tags that allow the style attribute here.